安裝環境
- CentOS7 主機
- Nginx
操作步驟
安裝certbot
1#如果你已經安裝了EPEL,這個步驟可以省略
2sudo yum install epel-release
3#安裝certbot客戶端
4sudo yum install certbot
使用嚮導自動安裝證書
使用certbot嚮導安裝,有界面,根據指示一步步操作就行,但是YCHEUNG進行到設置webroot的時候就error了,只好放棄
1$certbot certonly
命令行安裝證書
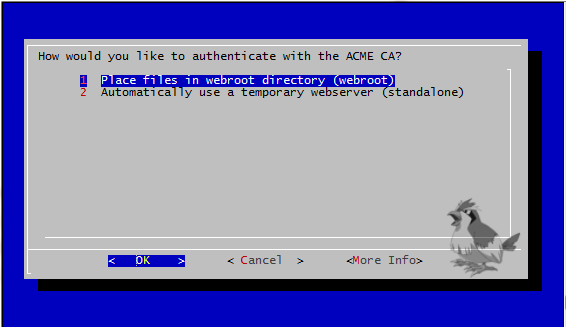
如果失敗,可以自行使用命令行安裝。用 certbot certonly命令,加上參數 --webroot表示使用webroot的方式安裝,或者你也可以使用--standalone方式安裝,standalone安裝需要使用80端口,也就是說一般你的站點需要暫停運行一段時間,不太友好。webroot則是它會生成一些文件到你的網站目錄下,然後訪問看驗證是否存在,所以使用這種方式的話,你需要在 nginx 裡面做設置,使它生成的驗證文件能夠被訪問。
在這個站點的nginx配置文件中的 server block尾部加入:
 1server{
 2    ...
 3    location ^~ /.well-known/acme-challenge/ {
 4        default_type "text/plain";
 5    }
 6
 7    location = /.well-known/acme-challenge/ {
 8        return 404;
 9    }
10}
然後重啟或者重新加載nginx: sudo service nginx reload
之後再運行certbot命令:
1certbot certonly --webroot -w /var/www/example -d example.com -d www.example.com -w /var/www/thing -d thing.is -d m.thing.is
-w後面指定你網站所在的根目錄, -d後面指定一個網站域名,如果多個域名指向同一個根目錄,可以再加一個 -d。
運行結果:
成功!!
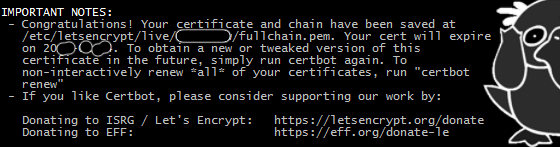
證書拿到了以後…
- 更改nginx配置,把來自HTTP的訪問都跳轉去HTTPS
- 證書有效期大約3個月,所以還要寫一個定時任務去更新正書
更新證書
可以寫定時任務更新, certbot renew --quiet ,也可以直接執行以下命令:
1certbot renew
刪除證書
輸入命令後,會給出證書列表供選擇刪除。
1certbot delete
Reference
- Let’s Encrypt SSL (官網)
- Certbot ACME client
- CentOS 7 Nginx Let’ s Encrypt SSL 证书安装配置 –发表于2016年3月3日 10:01