最近工作上要重新建站,公司有些站点是ASP的,程序老旧经常被黑。因为就是一般的企业展示类站点,就直接用wordpress重建了,页面样式还是用原来的,工作重点就是如何output出跟旧站一样的html结构。得益于这大半年的几个drupal项目,在做的时候思路跟以前不同了,不得不说drupal的核心思维还是很赞很科学的。
wodpress 默认插入相册 the_content() 输出的格式是:
 1		<div id="gallery-1" class="gallery galleryid-41 gallery-columns-1 gallery-size-full"><dl class="gallery-item">
 2			<dt class="gallery-icon landscape">
 3				<img width="688" height="457" src="http://localhost/wordpress/wp-content/uploads/201212011101061901.jpg" class="attachment-full" alt="201212011101061901">
 4			</dt></dl>
 5            <dl class="gallery-item">
 6			<dt class="gallery-icon landscape">
 7				<img width="688" height="458" src="http://localhost/wordpress/wp-content/uploads/201212011100281923.jpg" class="attachment-full" alt="201212011100281923">
 8			</dt></dl>
 9            <dl class="gallery-item">
10			<dt class="gallery-icon landscape">
11				<img width="688" height="319" src="http://localhost/wordpress/wp-content/uploads/201212011100547428.jpg" class="attachment-full" alt="201212011100547428">
12			</dt></dl>
13		</div>
显示结果如下(官网提供图片):
而Y.CHEUNG想要的效果如下(因为是rebuild站点,前台显示代码就沿用之前的,只需令wordpress输出的跟原来一致即可):
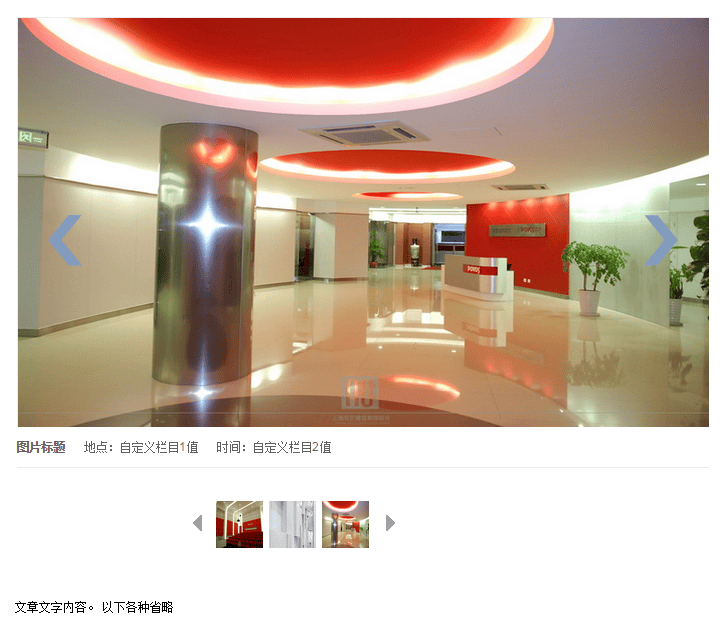
轮换自然是用JS实现,现在需要输出一张大图,一张缩略图,图片的标题字段,两个自定义栏目字段,以及文章内容。
解决方案:
1.在 functions.php 文件中添加以下代码
 1	/**
 2     * custom gallery output
 3     *
 4     */
 5	add_filter('post_gallery', 'addyuki_post_gallery', 10, 2);
 6	function addyuki_post_gallery($output,$attr){
 7		global $post;
 8
 9	if(isset($attr['orderby'])){
10		$attr['orderby'] = sanitize_sql_orderby($attr['orderby']);
11		if (!$attr['orderby'])
12			unset($attr['orderby']);
13	}
14
15	extract(shortcode_atts(array(
16		'order' => 'ASC',
17		'orderby' => 'menu_order ID',
18		'id' => $post->ID,
19		 'itemtag' => 'dl',
20        'icontag' => 'dt',
21        'captiontag' => 'dd',
22        'columns' => 3,
23        'size' => 'thumbnail',
24        'include' => '',
25        'exclude' => ''
26    ), $attr));
27	$id = intval($id);
28	if('RAND' == $order) $orderby = 'none';
29	if(!empty($include)){
30		$include = preg_replace('/[^0-9,]+/', '', $include);
31        $_attachments = get_posts(array('include' => $include, 'post_status' => 'inherit', 'post_type' => 'attachment', 'post_mime_type' => 'image', 'order' => $order, 'orderby' => $orderby));
32
33        $attachments = array();
34        foreach ($_attachments as $key => $val) {
35            $attachments[$val->ID] = $_attachments[$key];
36        }
37	}
38	if(empty($attachments)) return '';
39
40	$countpic = 1;
41	$output ='';
42	foreach ($attachments as $id => $attachment){
43		$img = wp_get_attachment_image_src($id, 'full');
44		$output .= '<div id = "image_xixi-'.sprintf("%02d",$countpic).'" class="image">';
45		$output .= '<img src="'.$img[0].'" width=692 height=410><div class=word><h3></h3></div></div>';
46		$countpic ++;
47	}
48	$output .='';
49	return $output;
50	}
2.在single.php中修改相应位置
1 <?php if ( get_post_gallery() ) :
2 $gallery = get_post_gallery(get_the_ID(),false);
3 ?>
4 <table width="100%" border="0" cellspacing="0" cellpadding="0">
5 <tbody><tr>
6 <td height="545" valign="top">
7 <div style="HEIGHT: 560px; PADDING-TOP: 20px" class="wrap picshow">
8 <!--大图轮换区-->
9 <div id="picarea">
10 <div style="MARGIN: 0px auto; WIDTH:692px; HEIGHT: 410px; OVERFLOW: hidden">
11 <div style="MARGIN: 0px auto; WIDTH:692px; HEIGHT: 410px; OVERFLOW: hidden" id="bigpicarea">
12 <p class="bigbtnPrev"><span id="big_play_prev"></span></p>
13
14 <?php the_content();?>
15 <p class="bigbtnNext"><span id="big_play_next"></span></p></div></div>
16 <table width="100%" border="0" cellspacing="0" cellpadding="0">
17 <tbody><tr>
18 <td height="40"><span style="color:#626262;"><strong><?php the_title();?> </strong> 地点:<?php echo get_post_meta(get_the_ID(),'地点',true);?> 时间:<?php echo get_post_meta(get_the_ID(),'时间',true);?></span></td>
19 </tr>
20 </tbody></table>
21 <!-- 缩略图区 -->
22 <div id="smallpicarea">
23 <div id="thumbs">
24 <ul>
25 <li class="first btnPrev"><img id="play_prev" src="<?php echo get_template_directory_uri(); ?>/images/left.png"></li>
26 <?php $count = 1; foreach($gallery['src'] AS $src){
27 ?>
28 <li class="slideshowItem"><a id="thumb_xixi-<?php echo sprintf("%02d",$count) ;?>" href="#"><img src="<?php echo $src; ?>" width="47" height="47"/></a></li>
29 <?php
30 $count ++;}
31 ?>
32 <li class="last btnNext"><img id="play_next" src="<?php echo get_template_directory_uri(); ?>/images/right.png"></li>
33 </ul></div></div></div>
34 <script>
35 var target = ["xixi-01","xixi-02","xixi-03","xixi-04","xixi-05","xixi-06","xixi-07","xixi-08",,,,,,,];
36 </script>
37 </div>
38 </td>
39 </tr>
40 </tbody></table>
41 <?php endif; ?>
42 <!-- 文字内容区块 -->
43 <div style="line-height:20px;"><br>
44 <?php echo strip_tags(strip_shortcodes(get_the_content())); ?>
45 </div>
大图的显示就是直接用了the_content()函数,修改functions.php就是修改了gallery在用the_content()输出时的格式。
小图的显示则主要是提取了图片的URL,然后自定义显示格式。
文字内容使用 get_the_conten()输出,用strip_shortcodes()去除插入的gallery的shortcodes,用srip_tags()去除HTML代码。
Y.CHEUNG做好之后,在网上看到别的解决办法,点这里。